Quickstart Digital Asset Library is an Experimental Module
There is no risk in using images downloaded from the Digital Asset Library, but we expect the process of logging in to access these digital assets to improve over time.
The Quickstart Digital Asset Library is not enabled in Quickstart by default. To enable the module, an Admin needs to go to Manage > Extend and search for Quickstart Digital Asset Library and install it.
All of the images and files you upload to Quickstart from the Digital Asset Library will be listed in the Content section of your admin panel under Files and Media. Once added, you can use them anywhere that you would images on your site.
How to get to the Digital Asset Library
Navigate to Manage > Content > Media and press the Add Arizona Digital Assets button.
How to Log In To The Digital Asset Library
Depending on your website, your login interface might appear differently from below. You may see University of Arizona styling. It is the same process regardless.
Ensure that both the Custom URL and Browser Login checkboxes are selected.
Image
Type in assets.arizona.edu in the URL field and hit Login.
Image
A new tab will open with different login options. Choose Login with NetID.
Image
- Login using your NetID and password.
Once you’ve successfully logged in you will see a confirmation screen.
Image
- You can now close this tab and return to your website
Press Continue.
Image
All users with a NetID should be able to log in to the Arizona Digital Shared Asset Library (Intelligence Bank), however student workers are not allowed to access media by default. In order to add your student-workers to the list of users in IntelligenceBank, please contact the Digital Asset Library Team (Garrett Flora).
NetID users are only able to be added to access control list after they attempt to log in once, which is what creates an account within the Intelligence Bank system.
Steps:
- Have all of your student workers log in at https://assets.arizona.edu
- Contact the Digital Asset Library Team (Garrett Flora).
Using the Digital Asset Library
The Digital Asset Library can be accessed anywhere on your website where you’d add an image.
- Click the Add Media button anywhere it appears on your website.
-
Image

-
- When you click on the Add Media button, you will be presented with the images in your site’s Media Library, as well as a blue button labeled Add Arizona Digital Asset Library Media
-
Image

-
- If you are not yet logged into the Digital Asset Library, you will be prompted to log in when clicking this button. See information on logging into the Digital Asset Library above.
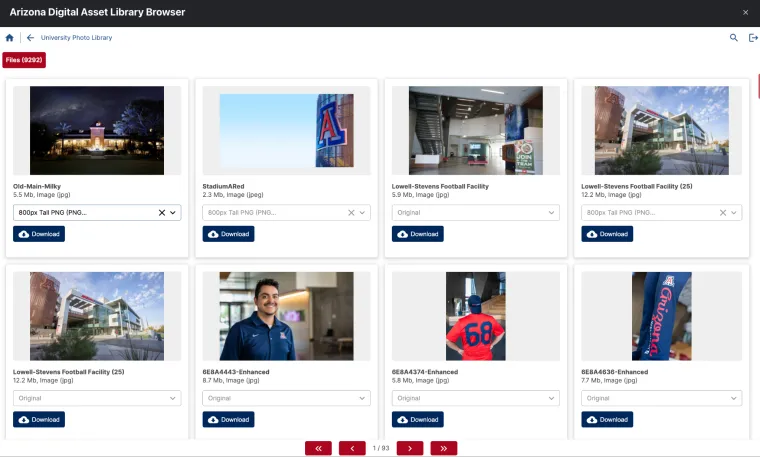
- Once logged into the Digital Asset Library, use the search to find images using keywords (like Old Main, Science, Students, etc).
- Alternatively you can browse folders you have access to by clicking on a folder.
-
Image

-
- Find the image you would like to add to your website.
Rights Management
While the majority of the photos and videos in this library are cleared for general use, please be aware that there are some legacy or shared assets with unclear origins. These are image that do not have clear documentation regarding photographer and/or model release status. The usage of these photos and videos generally poses a low risk, especially for educational or editorial purposes.
Just be aware that there’s always the possibility of receiving a takedown request, The department employing these assets shoulders all liability on behalf of the institution. Please be prepared to promptly remove any disputed assets if required.
If you have any concerns about your chosen photos, or if the website is high-profile or pertains to sensitive content, we recommend reaching out to our Marketing department for a thorough rights management review at brand@arizona.edu
- Some of the images have very large file sizes - do not use the full size image on your website! Instead, choose from available presets to bring in smaller files.
Image
- Press Download. (This adds the image to your site; it does not download it to your machine.)
Image
- All of the Alt and Title text will already be included. You can leave all of the default settings or change them.
-

- Insert the selected media into your website.
Tips
-
Note for marketers: If you will be using any of these assets in very high-profile websites, please contact Marketing & Brand Management (MBM) for an asset rights check prior to publication. The department using the assets assumes all associated liability on behalf of the institution. For any questions, concerns, or feedback, please contact MBM at brand@arizona.edu or 520-621-8747
-
Server space: Files take space on your server, and under most circumstances, your server space is not unlimited. Take advantage of the presets to limit the size of images.
-
Page loading time: Large files that are on your site can slow down the time it takes to load a page. By default, Quickstart resizes images and takes some additional measures to speed up the time it takes to load pages. However, try to delete files that are not in use, and don't add more images, video, or audio files than are necessary.
-
Reusing Files: When possible, reuse files by uploading them via the Media tab and then using the Choose File option to use them in your pages. However, be careful when deleting files by making sure you have accounted for all of the places that file may be used. Note that when you reuse a file in multiple places, the alt, title, file name, caption, and image credit are also reused.
Useful Links
Keywords
Media, Alt Text, DAM, IntelligenceBank, Intelligence Bank, Images

