
How to Create a Table
-
Create a page or edit an existing one.
- Add any content that has the Editor Toolbar (Text, Accordion, Cards, Text with Background, Text on Media) and select Table.
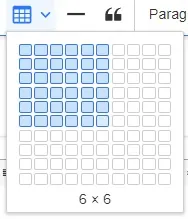
- Select your desired number of rows and columns using the selector that appears by hovering your mouse over the desired table size. The row/column count will appear below the grid for added clarity.
- Click on the table size selector to confirm your table size and insert it onto the page.
Fields
- Headers:
- First Row: Bolds the top row of data in the table
- First Column: Bolds column header
- Both: A combination of both in the table at the same time
- Caption: Displays a line of text at the base of the table
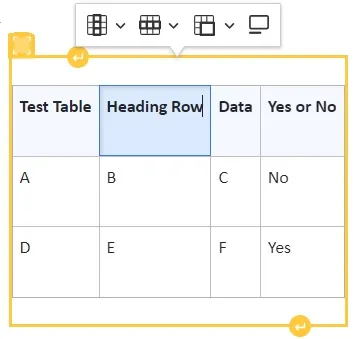
By clicking into your table, you are able to edit table cells, rows, columns, and properties by using the small wizard that appears above the table. From here, you can also paste information into cells or delete the table.
- Create a new table or navigate to an existing one. Click in one of its cells.
- The leftmost button in the wizard will show you options for editing, adding, or removing columns.
- The second button in the popup wizard will show you options for editing, adding, or removing, rows.
- The third button in the popup wizard will show you options for editing, merging, or removing, cells.
- The last button enables a caption for your table.
- Click outside of the table to confirm changes.
You can edit the source code of a table to alter its appearance. Below are some of the several ways you can customize a table.
How to Change Table Backgrounds:
- Navigate to the Source button in the Editor Toolbar.
- Navigate to the <table> tag at the top of the table source code.
- Insert class = "table table-light", class = "table table-dark", or class = "table table-striped" inside the <table> tag.
- Ex: <table class="table table-striped">
- Note: Backgrounds can also be combined. An example of this would be <table class="table table-striped table-dark"> which makes the table background alternate between 2 shades of dark gray.
- Save
How to Change Table Headers:
- Navigate to the Source button in the Editor Toolbar.
- Navigate to the <thead> tag at the top of the table source code.
- Insert class = "thead-light" or class = "thead-dark" inside the <thead> tag.
- Ex: <thead = "thead-dark">
- Save
How to Change Table Borders:
- Navigate to the Source button in the Editor Toolbar.
- Navigate to the <table> tag at the top of the table source code.
- Insert class = "table table-bordered" or class = "table table-borderless" inside the <thead> tag.
- Ex: <table class="table table-bordered">
- Note: Border classes can be combined with background classes within the <table> tag like this: <table class="table table-borderless table-dark">
- Save
How to Make Tables Hoverable:
- Navigate to the Source button in the Editor Toolbar.
- Navigate to the <table> tag at the top of the table source code.
- Insert class = "table table-hover" inside the <table> tag
- Ex: <table class = "table table-hover">
- Save
| Student | Contact Information |
|---|---|
| Wilma Wildcat | 520-621-5555 |
| Wilbur Wildcat | 520-621-5555 |
| Student | Contact Information |
|---|---|
| Wilma Wildcat | 520-621-5555 |
| Wilbur Wildcat | 520-621-5555 |
| Student | Contact Information |
|---|---|
| Wilma Wildcat | 520-621-5555 |
| Wilbur Wildcat | 520-621-5555 |