
All of the images and files you upload to Quickstart are listed in the Content section of your admin panel under Files and Media. On these pages, files can be added, stored, and deleted quickly. You can add them to pages or blocks later, if desired.
You can upload audio, video, remote video, image, and document file types.
How to Add Images, Videos, and Files
There are two ways to add media and files to your page: through the Content tab or through the Editor Toolbar.
This option is best for adding multiple files to your site at once. You will still use the Editor Toolbar (see below to embed your files within a page)
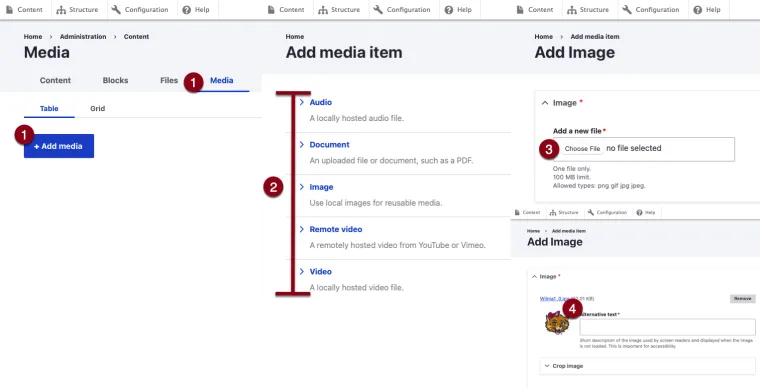
- Navigate to Manage > Content > Media > Add Media.
- Select the desired media file to be uploaded. [Audio, Document, Image, Remote Video, Video]
- Select the file/files from your computer (for Remote Video, enter the URL for the video).
- Images require Alternative Text describing the image for screen readers
- You can enter an optional Caption and/or Image Credit for images (both will appear beneath image in most displays)
- Image cropping allows you to edit the area of a photo that will be shown for different content elements (card, text on media) or when embedding an image using the Editor Toolbar (options for small, medium, large, square, and natural size).
- For video, you can upload a separate thumbnail image by clicking on Choose File under Thumbnail or Cover Image.
- Save.
You can add/embed a file directly on a page using the Editor Toolbar.
- Create a page or edit an existing one.
- Scroll to the bottom, and select a page element to include. [Text, Text with background, Accordion]
Click the Insert from Media Library button in the Editor Toolbar. It looks like this:
Image
- Select from the following options to upload a file: Audio, Document, Image, Remote Video, Video.
- Click Choose File to upload from the computer (or scroll down to choose an existing file in the media library)
- Images require Alternative Text describing the image for screen readers
- You can enter an optional caption or photo credit for images (both will appear beneath image in most displays)
- Image cropping allows you to edit the area of a photo that will be shown for different content elements (card, text on media) or when embedding an image using the Editor Toolbar (options for very small, small, medium, large, square, and natural size).
- For video, you can upload a separate thumbnail image by clicking on Choose File under Thumbnail or Cover Image.
- Save.
- Select the file you just uploaded (or another file you wish to use from the files listed).
- Choose Insert Selected.
Once you have added an image, video or other file to a page, you can size/align the file.
Using the Editor Toolbar
- Create a page or edit an existing one.
- Using the steps above, upload media into a text area and save the page.
- Edit the page again and locate the media you want to size/align
- Click the Edit Media button.
- Select an Align option (none, left, center, right)
- Select a size option (pixel dimension references image width):
- Large (1140px)
- Medium (760px)
- Natural Size - displays the original image size as uploaded - no scaling
- Small (360px)
- Square (220 x 220px)
- Very Small (220px)
- Save (the image or video will be embedded again with the options you selected).
Using the Content Tab
- Navigate to Manage > Content > Media
- Upload media using the steps above, or edit an existing media
- Select the desired image to crop
- Select the Crop Image drop down menu
- Utilize from the following options to resize the media:
- Using the cursor, drag the edges to resize the media or the center to use a certain portion of the media.
- Select from the preset options
- Card image: 4:3 aspect ratio, 568x426px minimum
- Carousel image: 111:50 aspect ratio, 1110x500px minimum
- Extra small full-width background: Scales to 575px width, 575px minimum width
- Large full-width background: Scales to 1920px width, 1920px minimum width
- Medium full-width background: Scales to 991px width, 991px minimum width
- Small full-width background: Scales to 767px width, 767px minimum width
- Large: Scales to 1140px width, 1000px minimum width
- Modal Image: 5:4 aspect ratio, 568x630px minimum
- Marketing Cloud - 30/70 Layout: 1:1 aspect ratio, 200x200px minimum
- Marketing Cloud - 50/50 Layout: 3:2 aspect ratio, 270x180px minimum
- Marketing Cloud - Hero Layout: 2:1 aspect ratio, 600x300px minimum
- Square Aspect ratio: 1:1 aspect ratio
Replacing a File
- Navigate to Manage>Content>Media
- Select Edit on the media item you’d like to replace
- In the Replace File section, choose your new file.
- Check the box labeled Overwrite original file.
Important Caching Details
Most likely, static files (.txt, .pdf, etc) served from your website will be cached by external caches for a long time, which means if you replace the contents of a file on your web server, users may not see the updated content until they clear their caches.
Useful Links
Keywords
Media, Alt Text, Caption, Cutline
Tips
-
Server space: Files take space on your server, and under most circumstances, your server space is not unlimited. Take advantage of alternatives such as embedding videos and audio files rather than uploading them.
-
Page loading time: Large files that are on your site can slow down the time it takes to load a page. By default, Quickstart resizes images and takes some additional measures to speed up the time it takes to load pages. However, try to delete files that are not in use, and don't add more images, video, or audio files than are necessary.
-
Reusing Files: When possible, reuse files by uploading them via the Media tab and then using the Choose File option to use them in your pages. However, be careful when deleting files by making sure you have accounted for all of the places that file may be used. Note that when you reuse a file in multiple places, the alt, title, file name, caption, and image credit are also reused.
-
Image resolution: Images with large dimensions (over 4000 pixels in width or height) may take extra time to be resized by Quickstart and as a result, they may appear broken for several hours until the resizing process is complete. If you encounter this issue, try uploading a smaller version of the image or using a different display mode for the image.